
Welcome to my guide for beginners to JasX games and how to set up an outfit.
This guide is to assist you in setting up your RLV clothing folders. This only needs to be done once per outfit, so do not let the length of this guide prevent you from making all kinds of interesting looks. Once you have done this once, it will be easy to recreate for new outfits.
How JasX Handles Clothing
During any of the JasX games, there are usually three states (four if you use a strap-on). You are either dressed, stripped to your undies, or completely naked, and usually in that order.
A fun outfit takes advantage of all three states, so plan your outfits to always gain or lose clothing when switching between them. Below is a quick-start guide, followed by a more detailed guide with an example of setting up an outfit.
Further down the page, you will find the guide on setting up outfit groups, which were introduced in the JasX HUD 0.5.8.
QUICKSTART
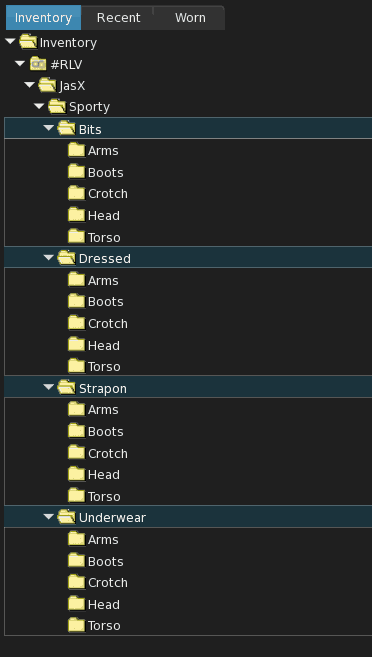
The folder layout should look like the image to the left, with the letters in capital where shown:
- #RLV -> JasX -> Outfit Name -> The four states of clothing -> The five parts of clothing
“Sporty” is the name of my outfit in the example; name your outfits whatever you wish.
In each folder, you copy your items as links to the folder that corresponds to what you want to wear at that point. Only add the items you want to wear, nothing else. Items in these folders are automatically added or removed during state changes.
Your body, for example, would never get added to these folders unless you specifically want to swap it during a game.
Here are some examples of how the outfits work:
Example 1: Shoes and Socks
- Dressed – Boots folder: Put both the shoes and the socks here.
- Underwear – Boots folder: Put only the socks here.
- Bits folder: Leave both out.
Example 2: Layering Pants, Thong, and Parts
(Useful if you wear pants when dressed, but leave the thong off to avoid clipping issues, wanting the underwear state to show the thong, and the naked state to show your private parts.)
- Dressed – Crotch folder: Put only the pants here.
- Underwear – Crotch folder: Put only the thong here.
- Bits – Crotch folder: Put only your private parts here.
DETAILED OUTFIT GUIDE
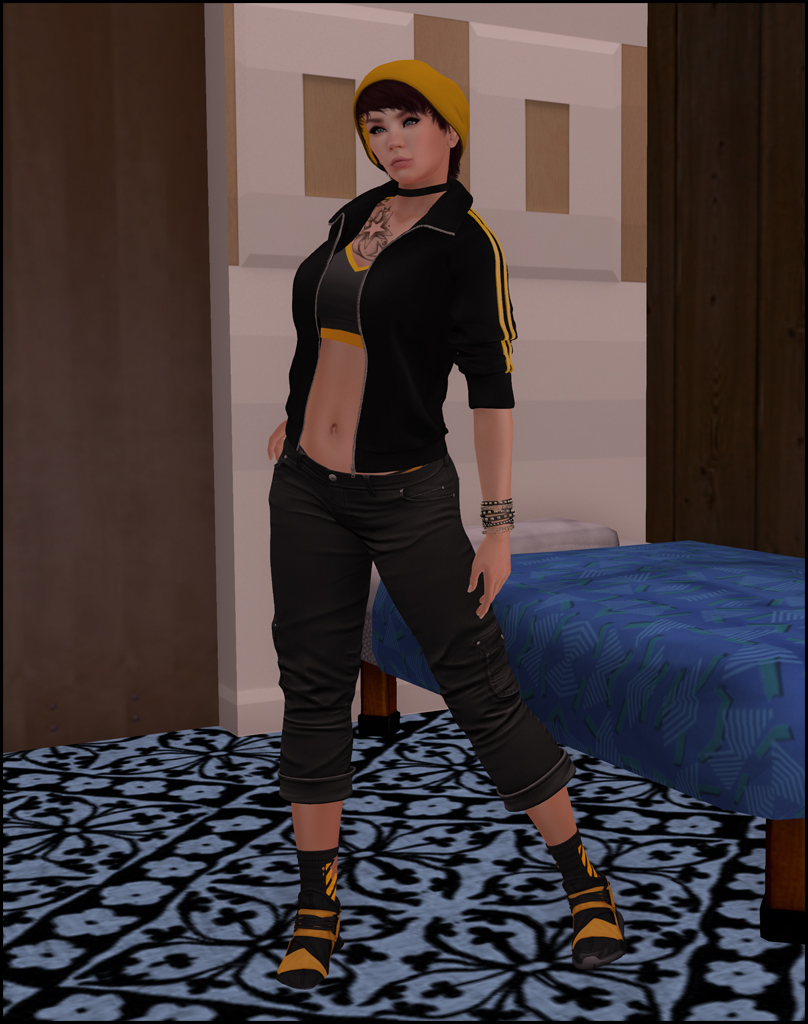
For this example, I am going to set up the outfit pictured to the right. It is an urban and sports-themed outfit that takes full advantage of all three clothing states:
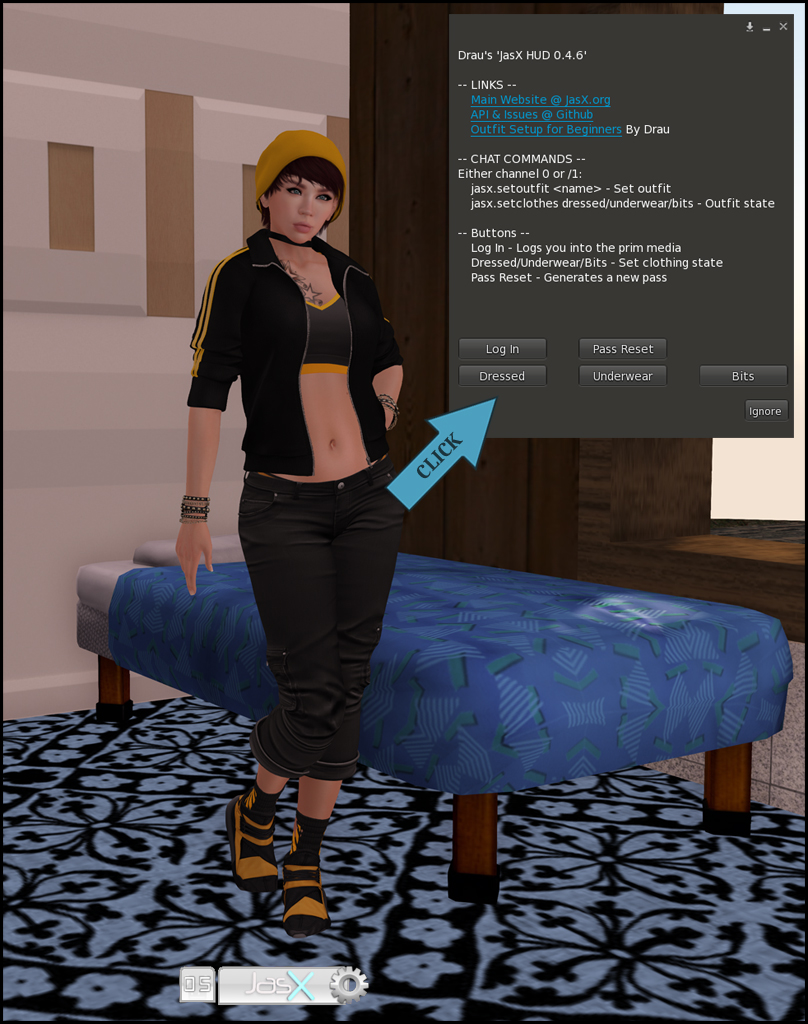
- Dressed: Features a jacket, pants, shoes, bracelets, and a hat. The sports bra can be seen through the jacket, with a bit of the thong sticking out.
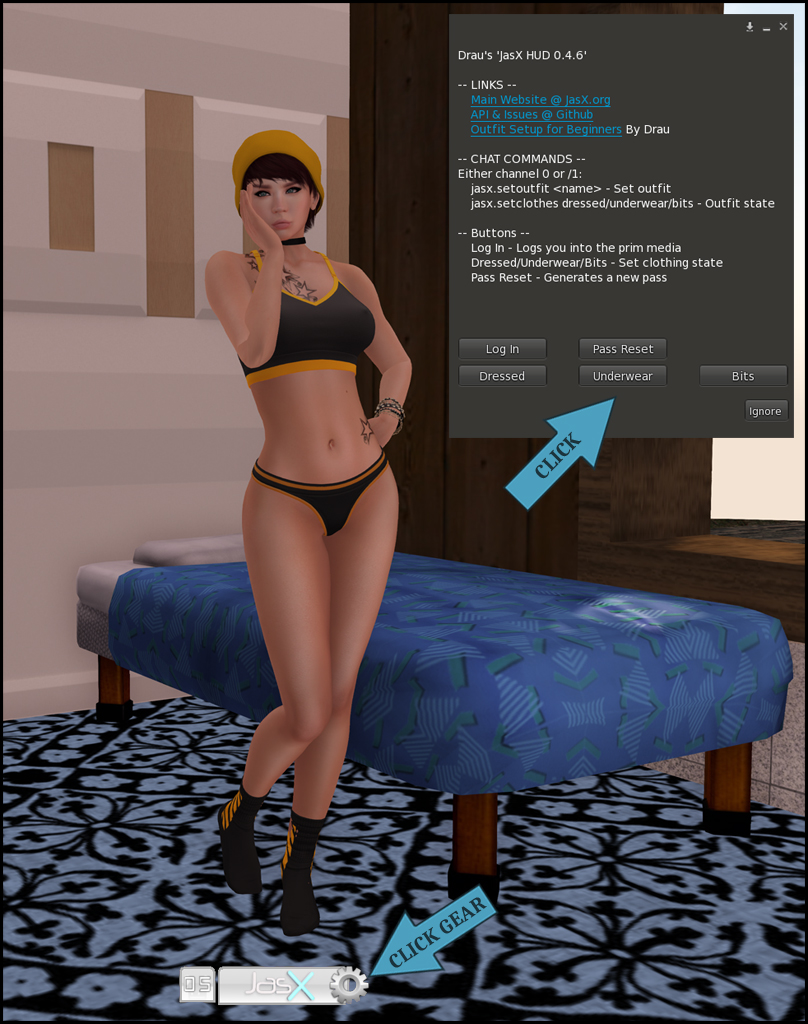
- Underwear: The jacket and pants come off, leaving the sports bra, thong, hat, socks, and one bracelet on.
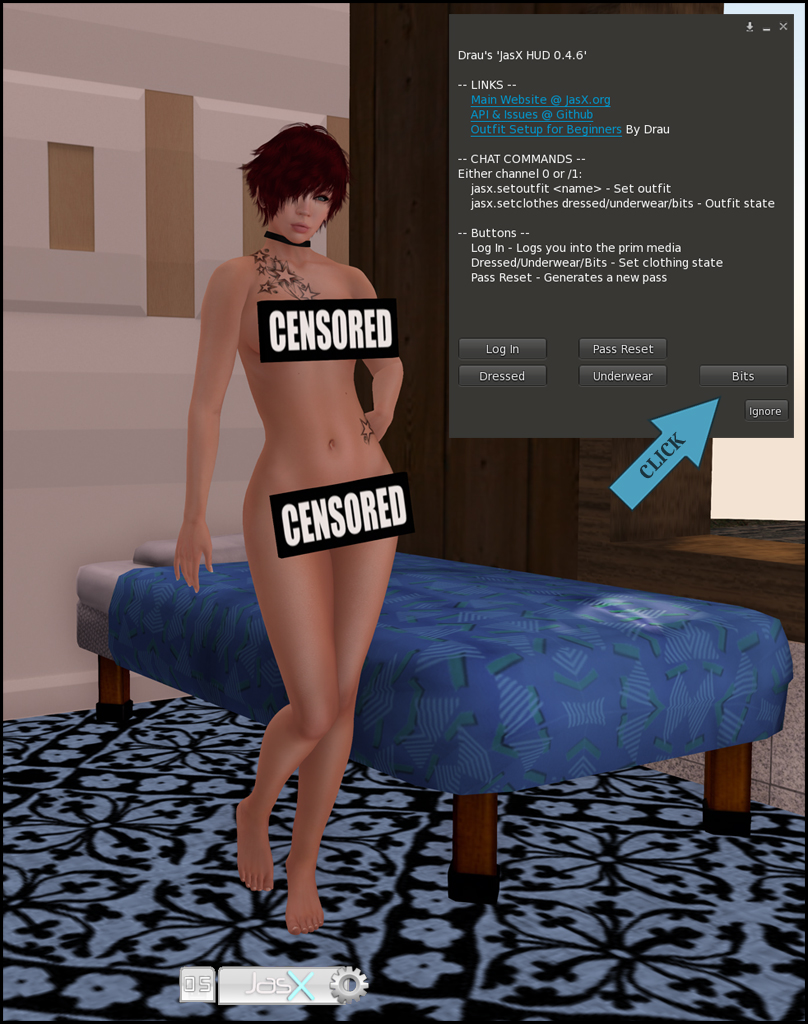
- Naked: Everything is removed. Even the hat gets taken off, which is done using a little trick by changing out the hairstyle.
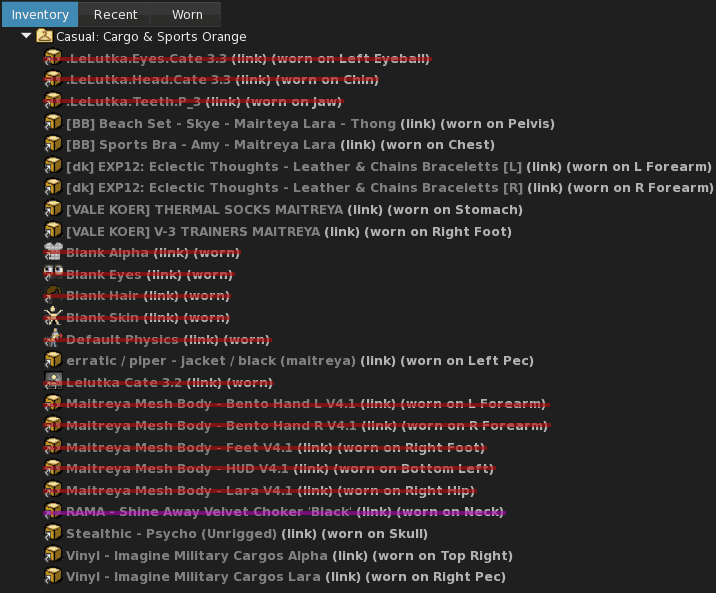
Using the Second Life Outfit window to save outfit first is a great way to see exactly what you are wearing and speed up this entire process.
On the left is my full outfit via the inventory window.
The colored lines represent items I will not copy to my JasX outfit folder. This is because the JasX folders only require items that the HUD needs to attach and detach automatically. Everything else stays out.
- Red: My mesh body and head, default system layers, shape, and physics.
- Purple: A clothing item that I never want detached. In my case, my favorite choker.
FOLDER SETUP
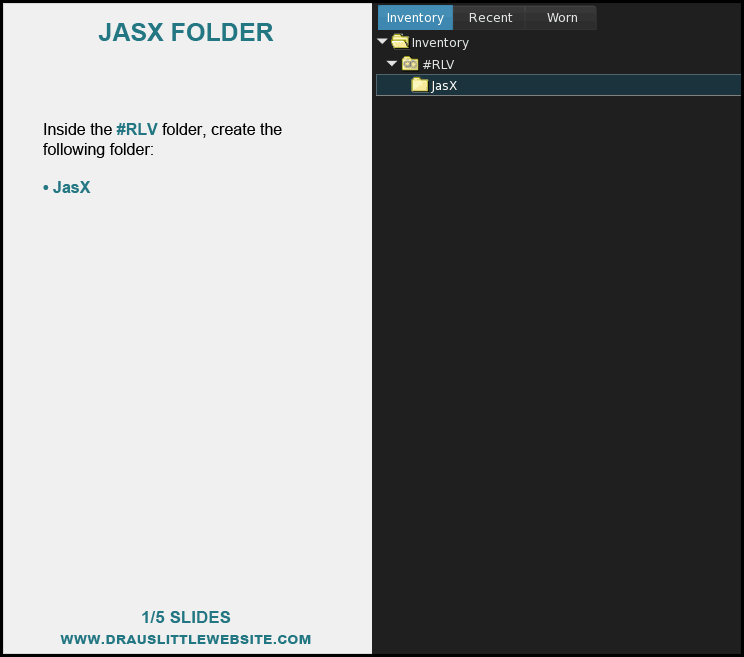
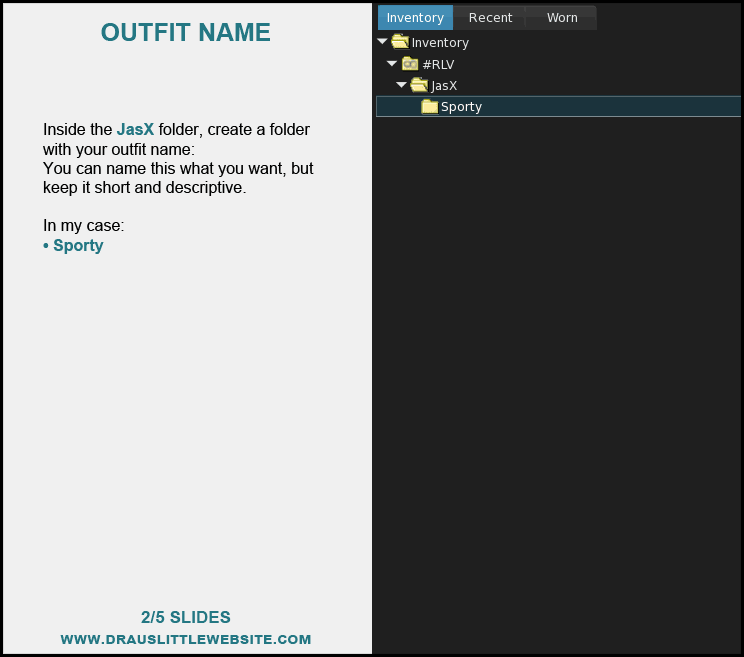
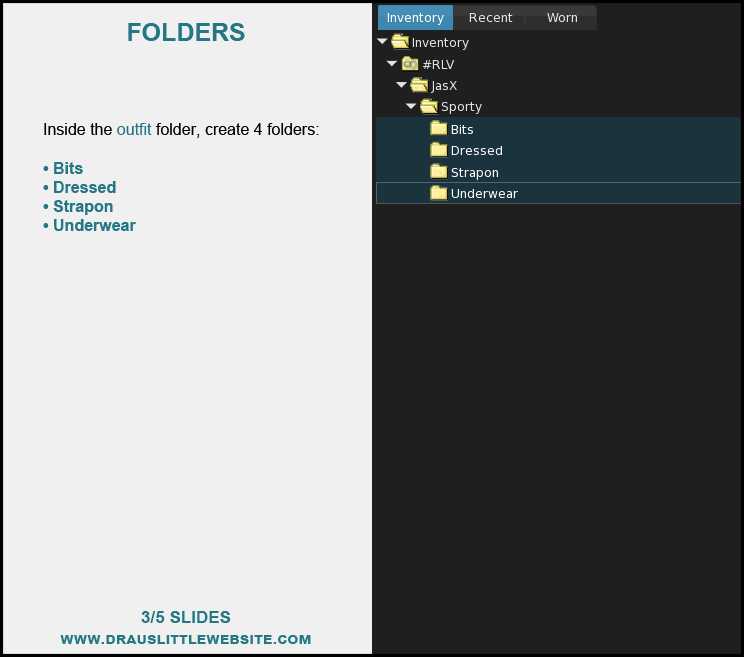
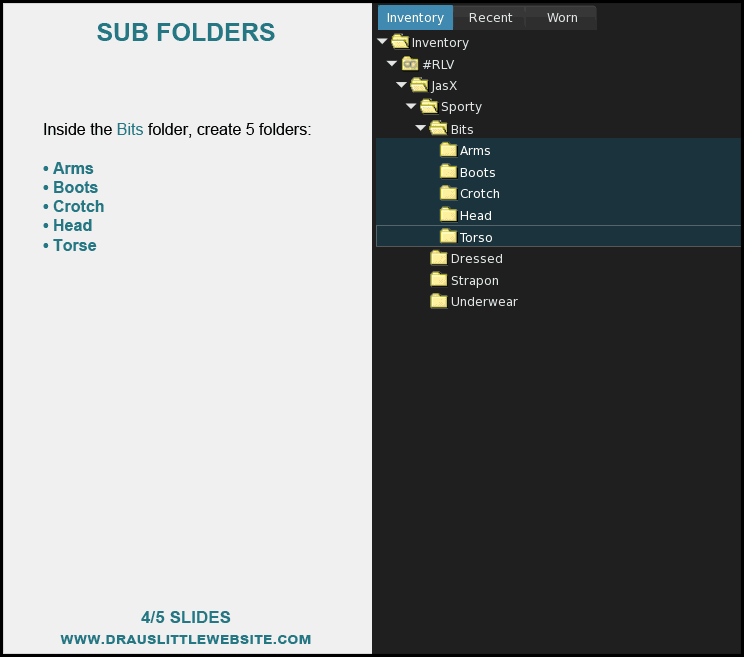
Click through the slides below and follow the instructions for the initial folder creation for an outfit.
IMPORTANT: Name the folders EXACTLY as I have named them in the slides to the right, matching the capitalization precisely where shown.
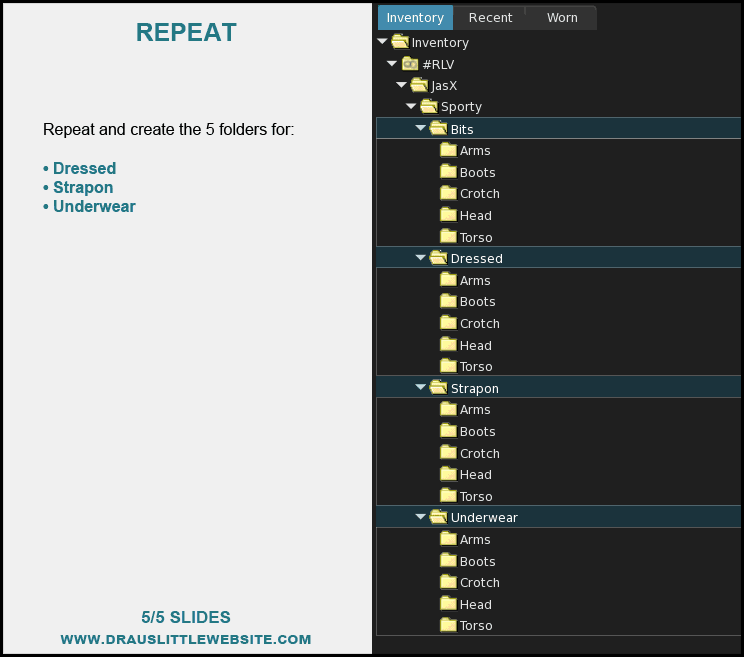
OUTFIT SETUP
IMPORTANT: As mentioned above, ONLY copy the items that you want to be automatically applied or removed. DO NOT copy in your mesh body, head, hair, etc. (unless you specifically want to swap to a different hair style or body during the game).
IMPORTANT: You want the copied items to be LINKS, not a copy of the actual item.
- If you copy from your Second Life Outfits folder, pasting normally will automatically create a link.
- If you copy from your regular Inventory folders, you must right-click the JasX folder and select “Paste as Link”.
You can easily verify this by checking the end of the item’s name; it will always display the text (link).
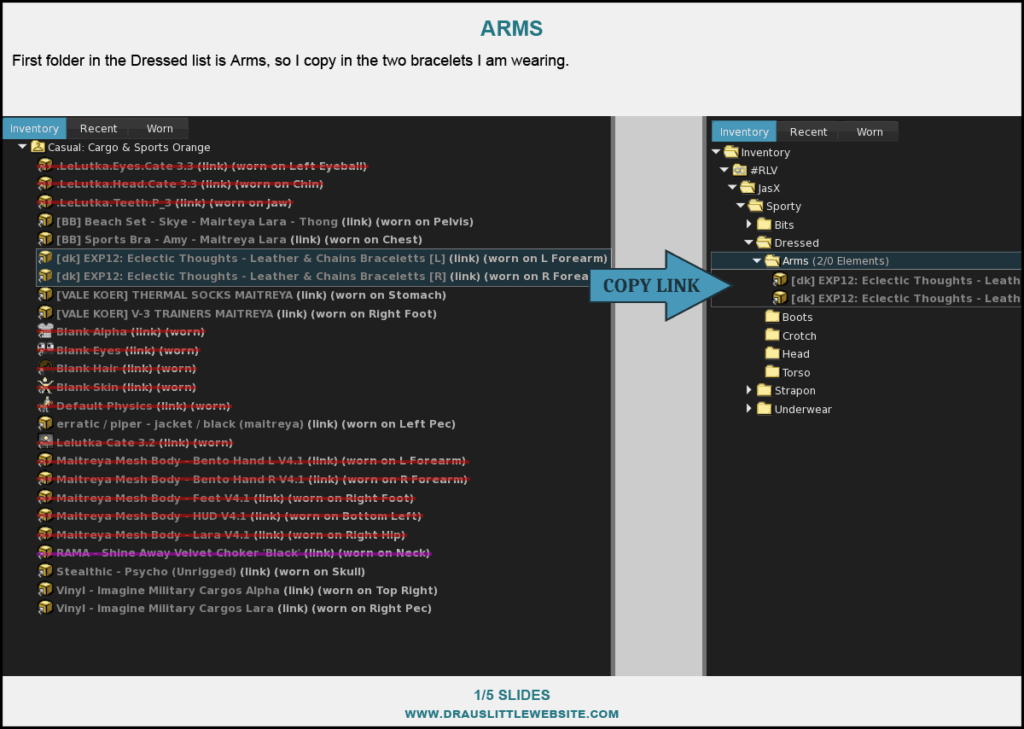
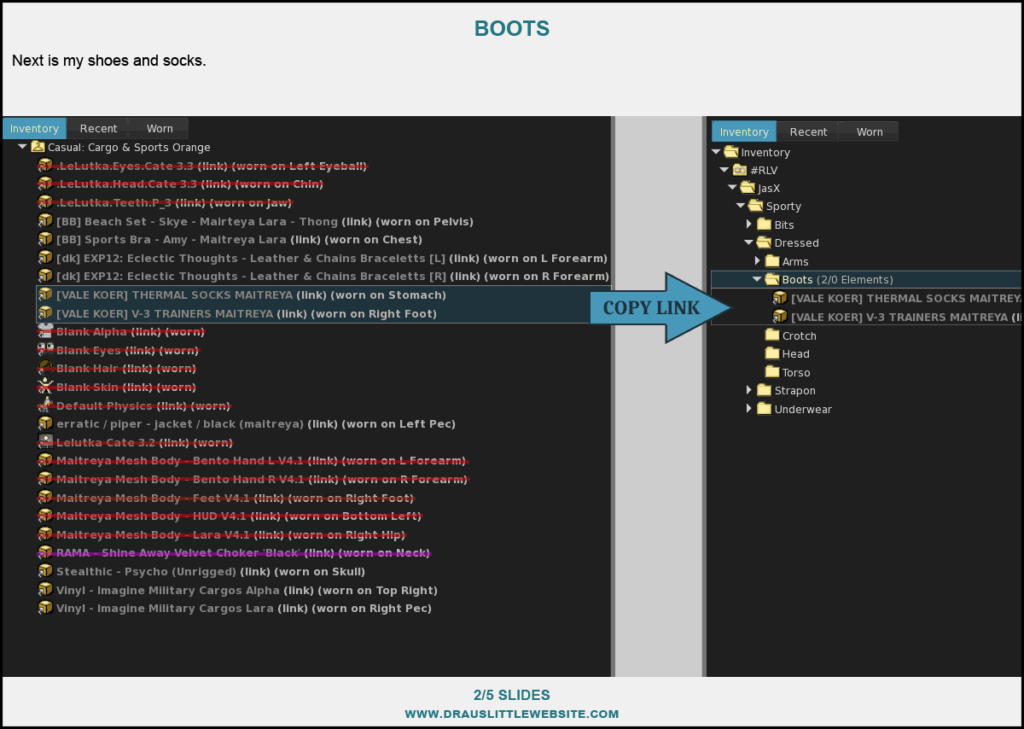
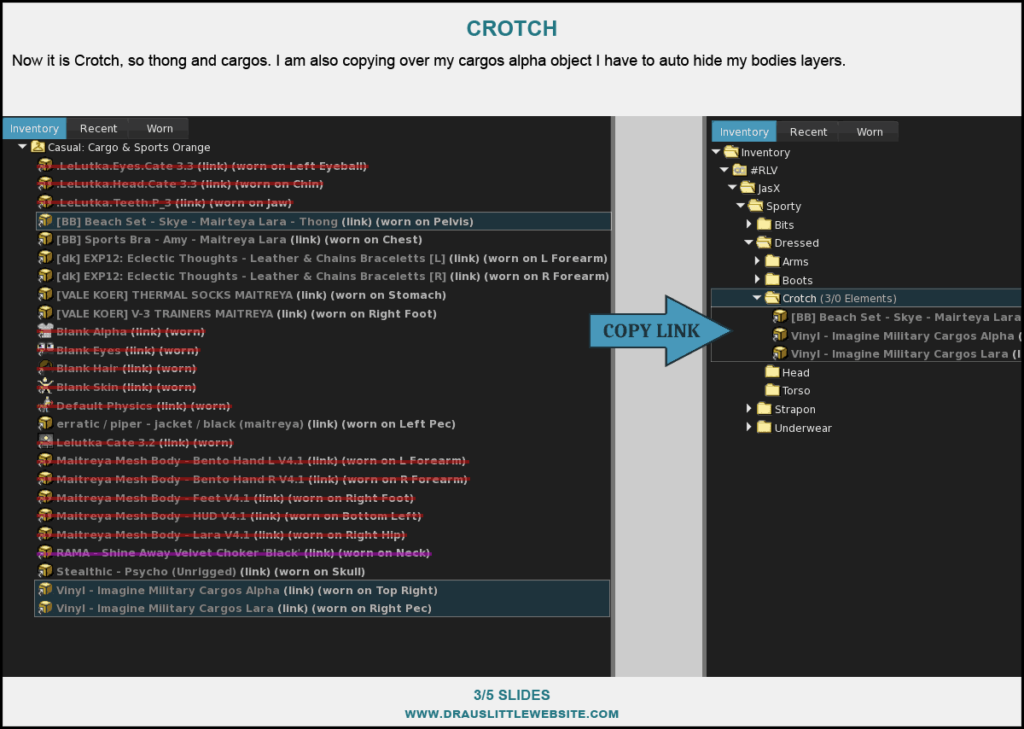
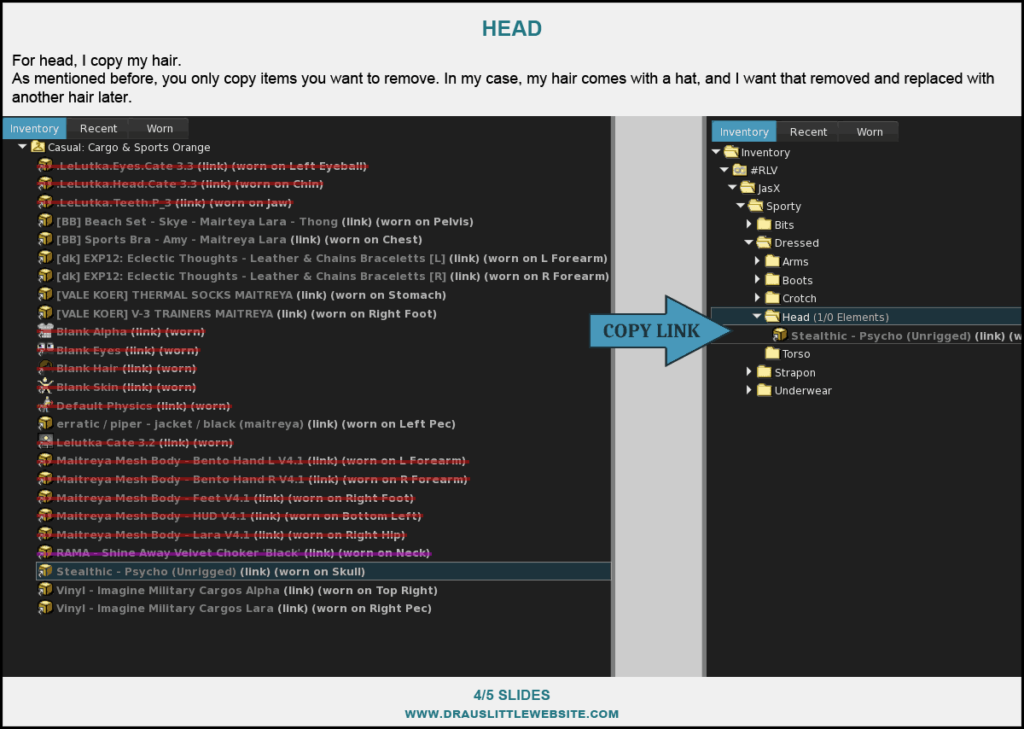
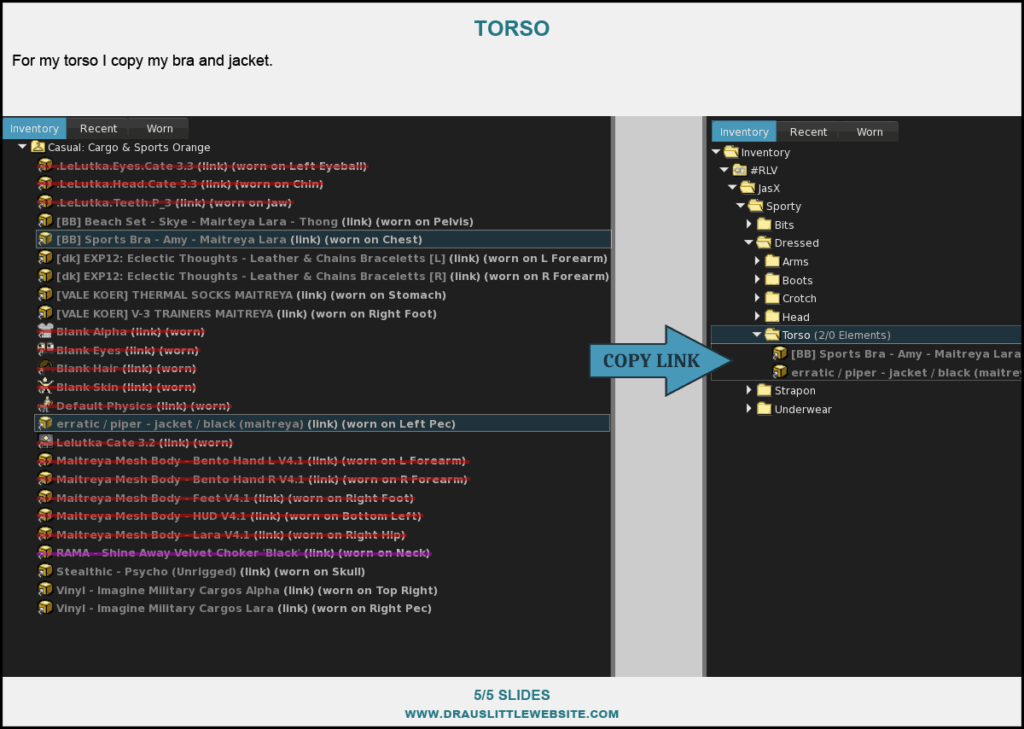
Now, let’s set up the actual JasX outfit. We will start with the Dressed folder first, so go ahead and open it. This represents your full outfit, everything you wear when the game begins. Inside, you will see the five subfolders you created earlier. Open the first one: Arms.
Follow the slides below to begin moving your items.
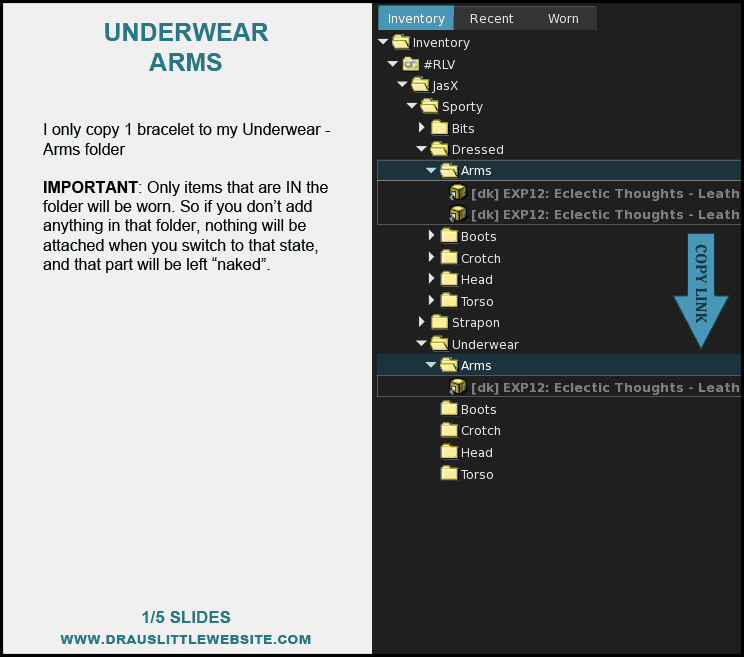
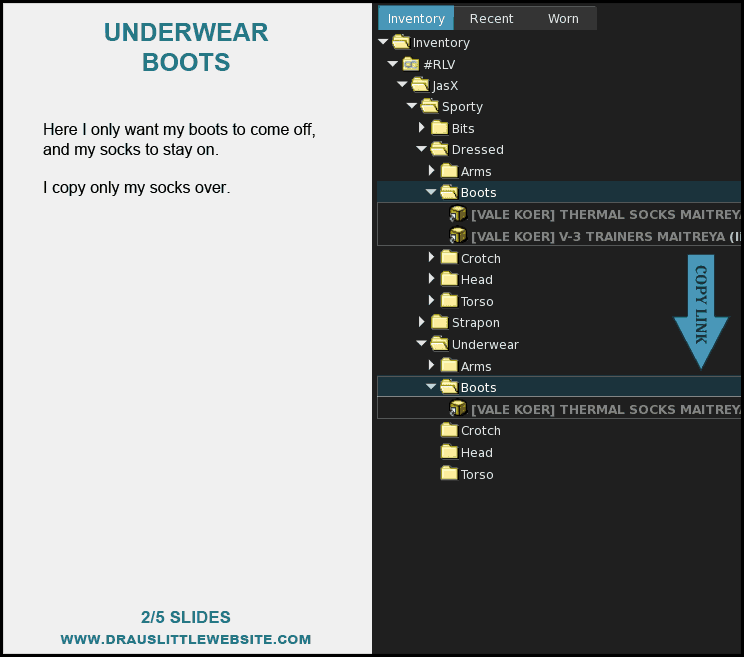
Now we need to set up the Underwear folder, and we will only copy links that we want to wear while in the underwear state.
Open your Underwear – Arms folder.
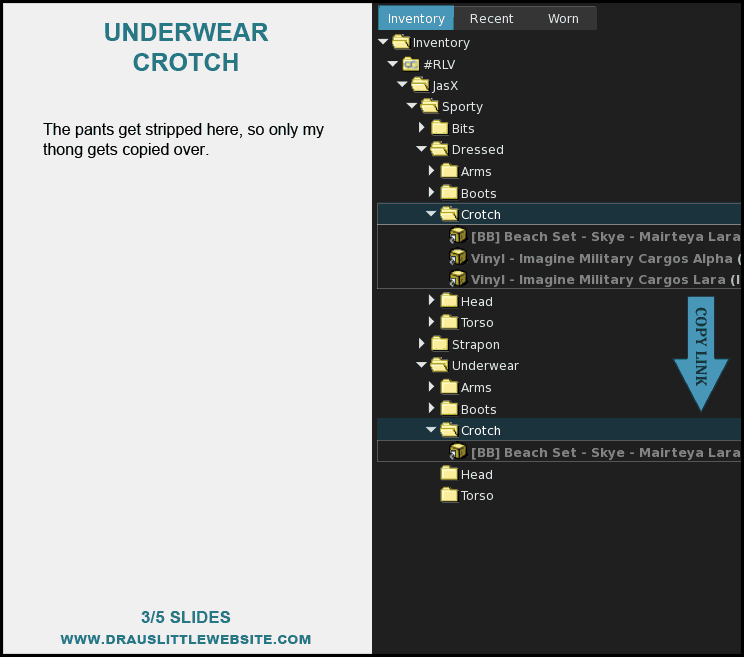
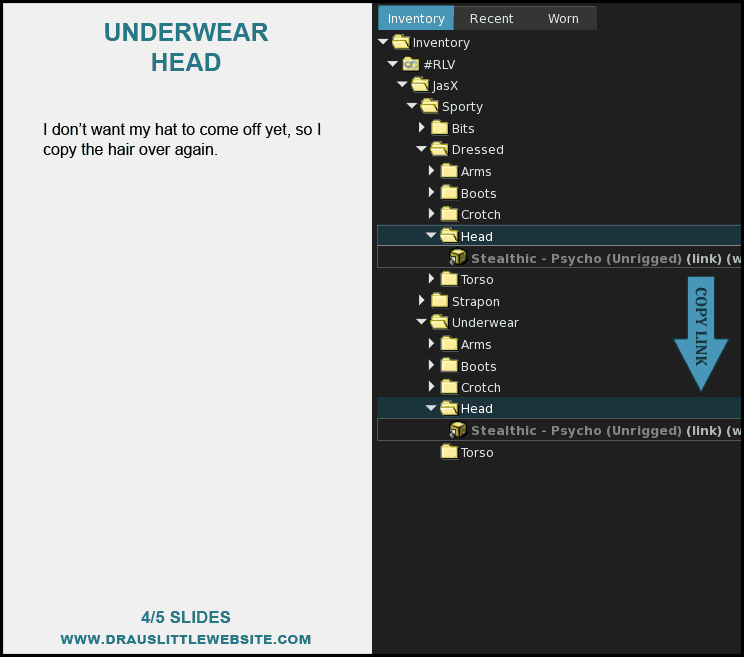
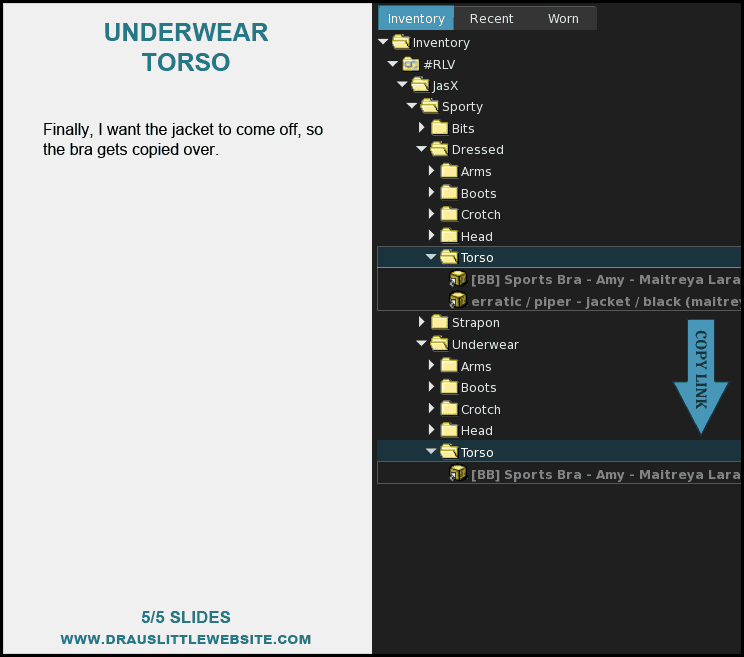
And that is it for my Underwear state.
Last state and the easiest usually, Bits, also known as naked! This will be where all your private parts go in.
Open your Underwear and Bits folders.
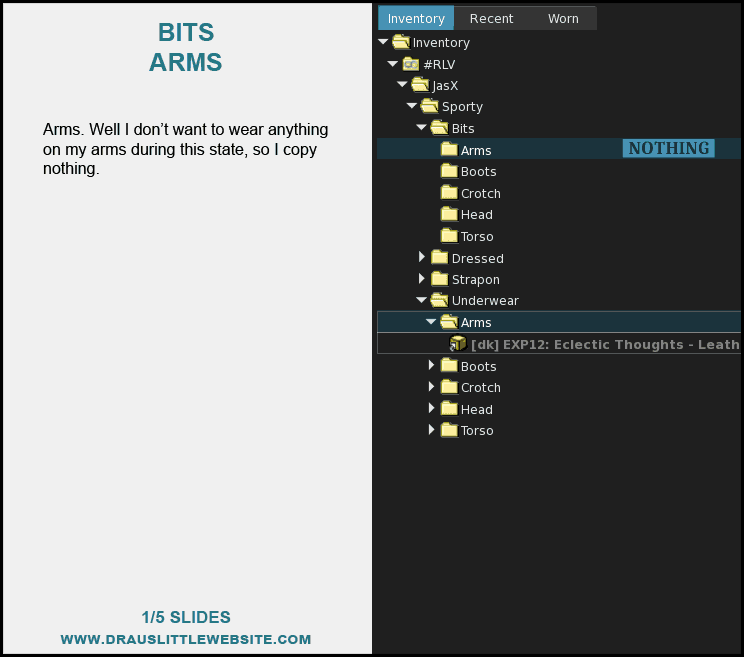
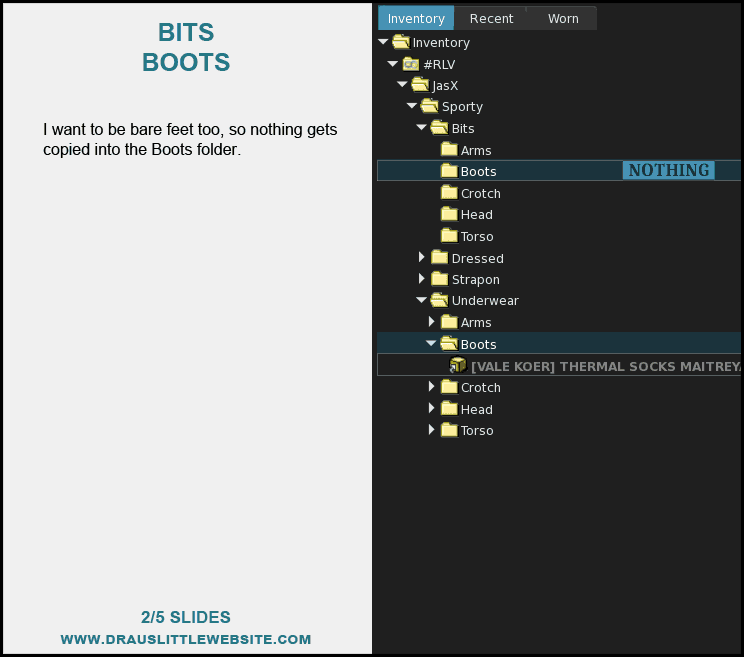
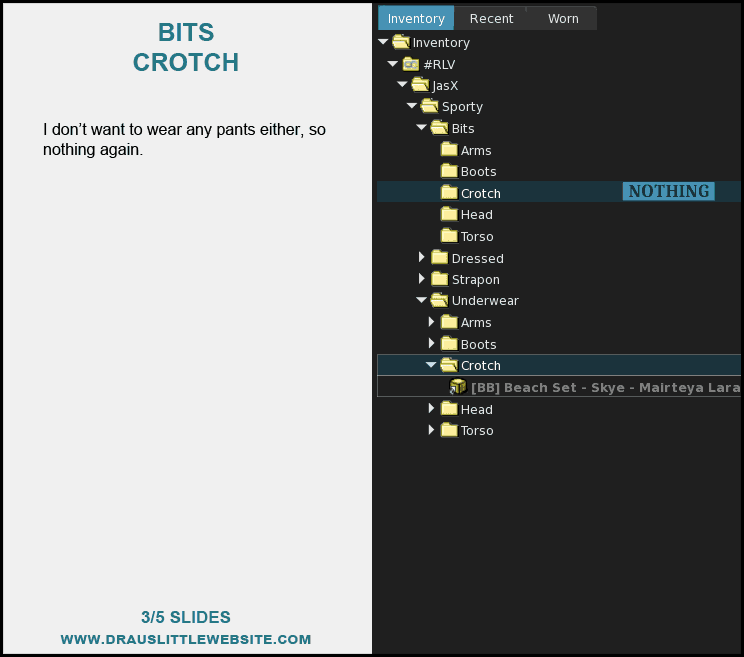
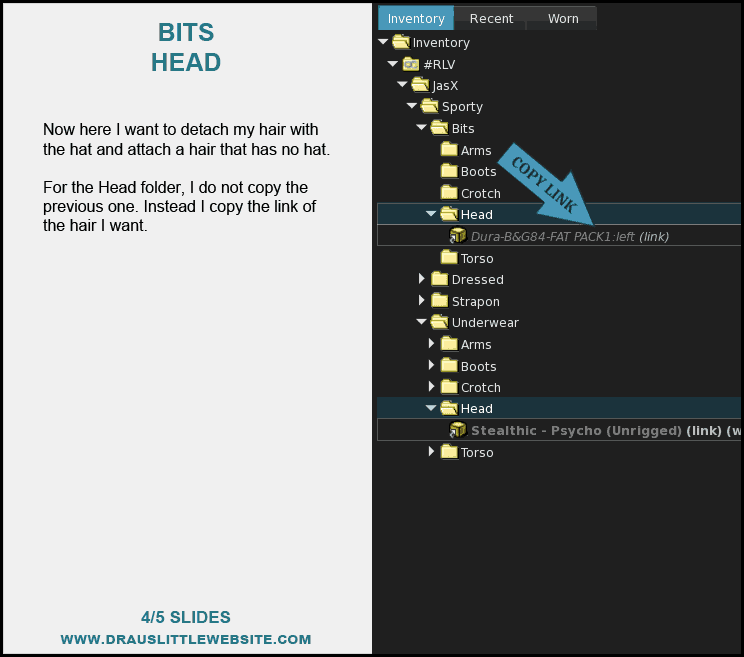
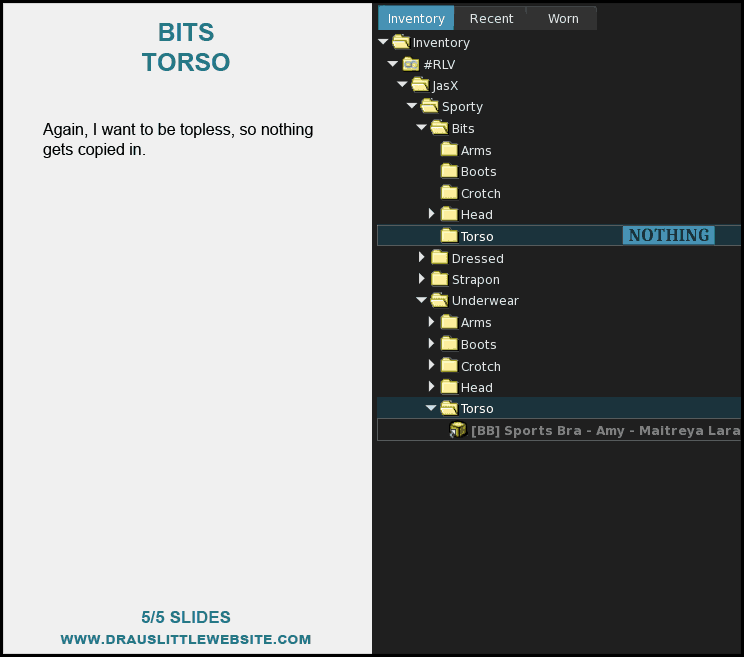
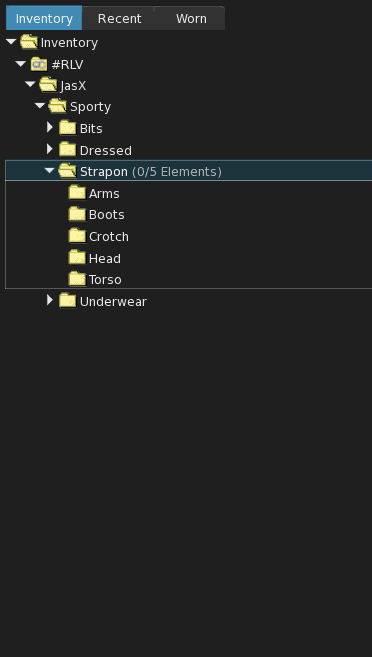
And that is it, your outfit is done!
Oh!… but what about this folder called Strapon? This is, as the name states, for a strap-on or any adult attachments you want automatically worn when a “moment” calls for that.
The Strapon folder has the same sub-folders as the others, so just copy and paste as link your attachments in the folder that makes sense.
SELECT OUTFIT
Now that your outfit is set up, you will need to use the JasX HUD again.
Go to the HUD tab (the top-left blue heart button) and select your outfit on the right side of the screen. If you do not see your outfit listed there, simply hit refresh.

TEST OUTFIT
Now to test if it actually works. Click the buttons as displayed below and see if your outfit changes as expected.
OUTFIT GROUPS
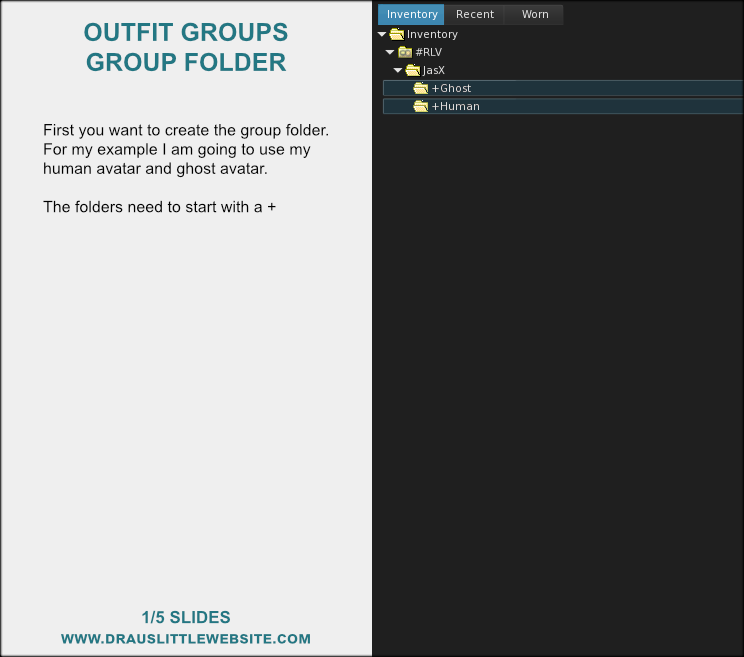
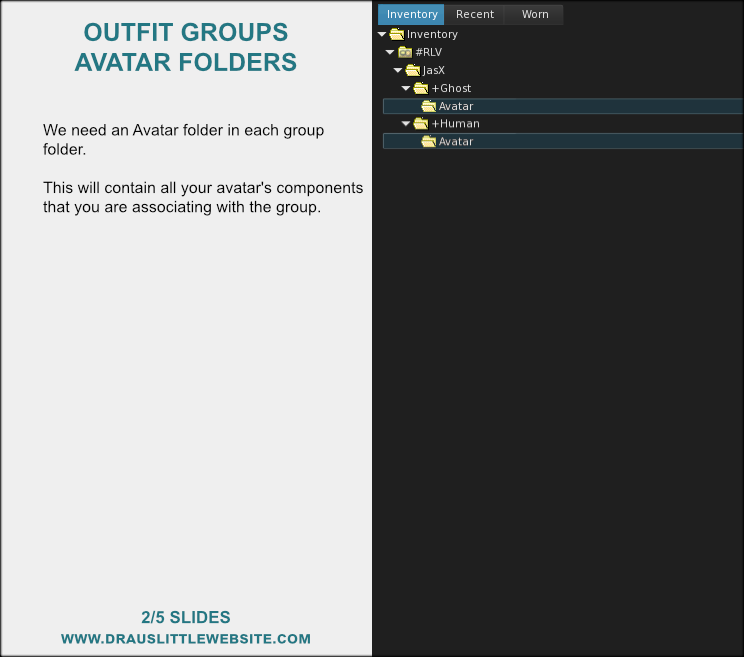
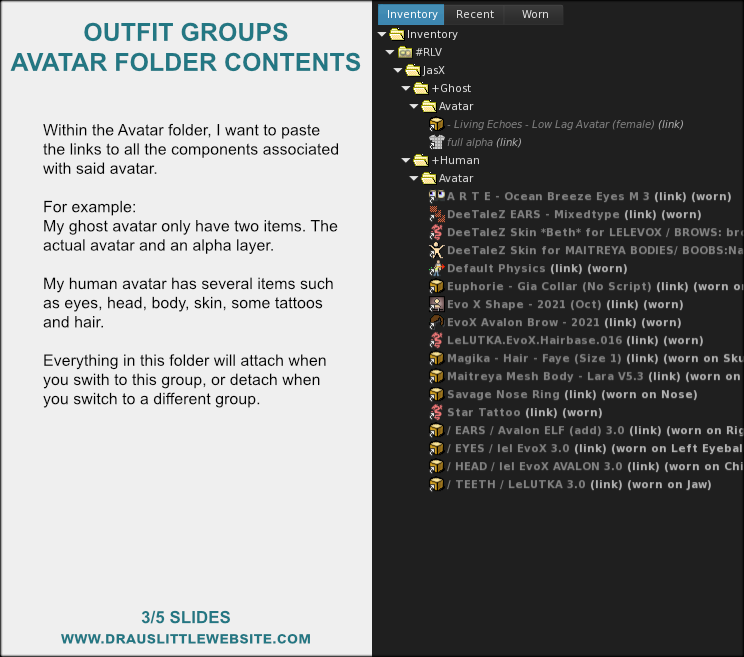
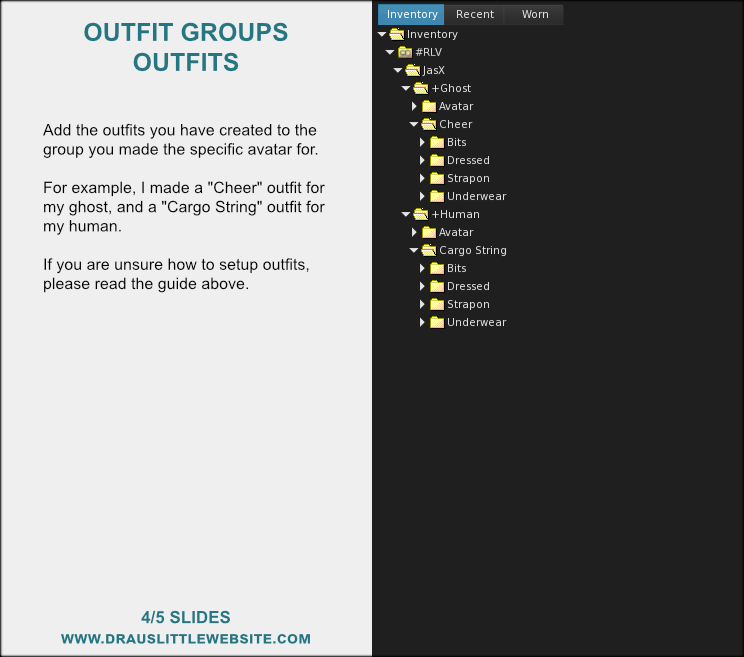
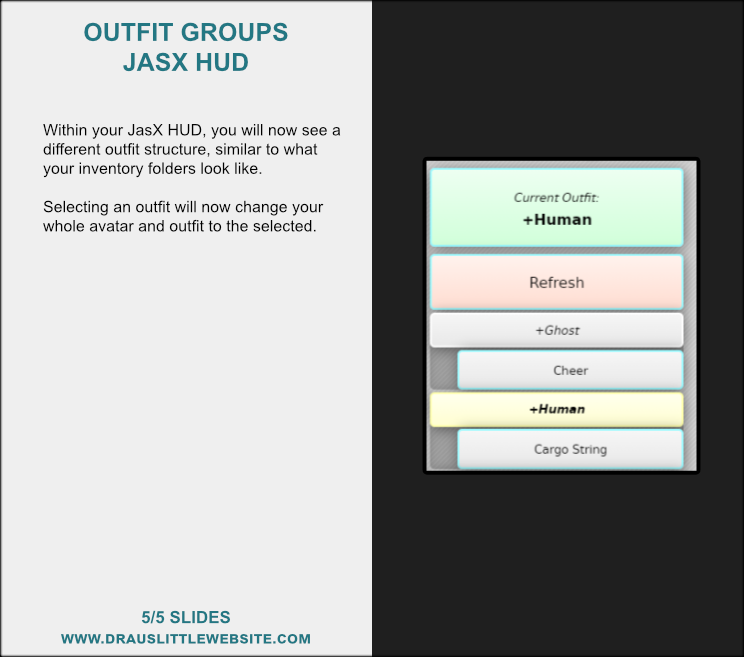
With the JasX HUD 0.5.8 and later, you can now create outfit groups. This allows you to have different avatar bodies set up, each with their own distinct outfits. In my example below, I am setting up my human look and ghost look.
DONE
That is it!
If your outfit isn’t working quite right, double-check these common culprits:
- Your RLV is turned off (make sure it’s enabled in your viewer preferences!).
- Folder names or structures don’t match exactly.
- The correct outfit isn’t selected in your HUD.
I hope this guide helped you get everything set up smoothly! If you’re still stuck, have suggestions, or just want to say hi, feel free to reach out. You can use the contact form, or drop me (Drau) an IM directly in Second Life. I’m more than happy to help you out.
Have fun! ♥
EXTRA
These are chat commands that you can use to quickly switch between outfits, test them, and change your settings.
You can say them either in local chat or on channel 1.
Change Outfit
jasx.setoutfit <outfit name>
Example:/1 jasx.setoutfit sporty
Change Outfit with Group (JasX HUD 0.5.8 and later)
jasx.setoutfit <group>/<outfit>
Example:/1 jasx.setoutfit +Human/Cargo String
Set Clothes State (Dressed, Underwear, Bits)
jasx.setclothes <state>
Example:/1 jasx.setclothes bits
Attach or detach your Strapon folder.
jasx.setstrapon <1/0>
Example:/1 jasx.setstrapon 1
Set sex
Sex is a number combination: 1 = penis, 2 = vag, 4 = breasts.
Simply add together the ones you want to use. So 1 = male (penis), 6 = female (vag/breasts)
jasx.sex <flags>
Example:/1 jasx.sex 6