
Welcome to the Fright Map Development Guide.
This guide will assist you in creating a map for the JasX game, Fright, especially when it comes to using the Fright Dev HUD
This guide will not go into detail about how to build or script in Second Life. General know how is required to build a map but scripting is not required at all. I did however include a small script for assistance later in the guide.
REQUIREMENTS
- FrightDev 1.1 HUD. You can get it with the Fright game at the JasX Store at Quiddity or at my Little Oasis.
- Make sure it is version 1.1
- The TOME, which is the game controller for Fright. You can also get that at my Little Oasis.
- You will also require a large are to build, with enough prims and long auto return timer.
BUILDING A MAP
I highly recommend building your map before doing anything related to the FrightDev HUD.
Pick a theme and build it out, keeping the layout interesting while at the same time fun. The trick is to have players keep exploring and searching but be able to run, hide or catch other players. Boxes to hide behind, forests to explore and get lost, different/themed rooms is all examples to keep things interesting.
Consider where you want to place things like traps, treasure, props, etc. but do not waste all your time doing this as you can adapt your map later. See the optimization topic below.
Keep these things in mind while building:
SIZE & PRIMS
The biggest problem when it comes to Fright maps is their size, amount of prims you use and your limitations. The bigger the map and higher the prim count, the harder it will be to find a place that you can rez the map. The maximum I would recommend for a map size is 100 x 100, at 1000 prims.
You also need to keep in mind how many people you want to accommodate. Do not build a map the size of a sim expecting 40 people. Yes, that would be fun, but realistically, an average of 8 players are often the case.
The trick is to find the right balance to keep the map interesting, but at the same time not to drain the sim you are on or limit your options where you can play.
TOME LOCATION
When building your map, you will need to place the TOME(usually a book) in a location where players will start the game and bring the treasure back to. This is also where players join and the host configure the game rules.
See path tips below as that will determine where you place the TOME in your game.
There is two things you HAVE to keep in mind:
DO NOT MOVE OR ROTATE THE TOME AFTER USING THE FRIGHTDEV HUD!
DO NOT ROTATE YOUR MAP AFTER USING THE FRIGHTDEV HUD!
I cannot stress this enough. If you use the FrightDev HUD and setup spawn locations, then deciding afterwards you want to change the tome location, rotation or map rotation, all of your spawning positions for prop/door/trap/etc will be wrong. You will have to set up all the items again.
The reason for this is that when you use the FrightDev HUD, the spawns is calculated with an offset to the TOME. If you change the TOME location, your item’s location changes.
Keep this in mind if you are considering moving the TOME at all.
PATH TIPS
Paths back to the TOME are extremely importantly. You want to give enough access so that players can come from different points to return the treasure, but also not make it that no one can catch them. This balance can be hard to find, and testing the map with a few people will give you a good idea as to what you have to change.
OPTIMIZATION & BEST PRACTICES
I have found it the easiest to build the map as I like it, then start optimizing the following:
- Move furniture around to make traps/props/treasure locations interesting.
- Add decorations where areas look empty or boring.
- Link as many items together as possible, using convex hull as the physics shape type, if you can, to bring prim count down.
- Replace high prim count items with mesh where you can if you are not using mesh already.
Do not forget BACKUPS! These maps can grow to be pretty large and it can become easy to accidentally delete something, texture the wrong object or loose track of time and have a sandbox auto-return all of your map.
BUILDING A MAP
The FrightDev HUD is used to set all the spawning locations and settings for the map.
Before using this, the game TOME needs to be set up. See information and warnings above.
We will first create a notecard: The notecard tells Fright what to rez and where. You will need this when you start setting the item positions.
1. Create Notecard
- Create a notecard in your inventory and name it Assets
- In the notecard, set the first line to PSR: 2.2
- This is how often items will spawn. You will need to find the correct balance for tuning this, but 2.2 is usually a good starting point.
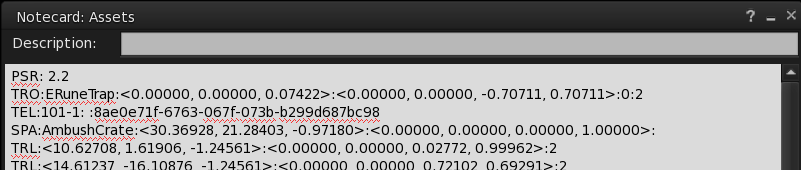
2. Add traps
Only add the traps (the whole line) you wish to add to your game in the notecard. Usually you want to add all of these unless they do not fit the theme.
TRO:ERuneTrap:<0.00000, 0.00000, 0.07422>:<0.00000, 0.00000, -0.70711, 0.70711>:0:2
TRO:Pistont:<-0.01241, 0.00684, -0.16260>:<-0.00000, 0.00000, 0.00000, 1.00000>:1:3
TRO:RuneTrap:<0.00000, 0.00000, 0.07422>:<0.00000, 0.00000, -0.70711, 0.70711>:0:2
TRO:SpiderTrap:<0.00000, 0.00000, -0.17139>:<0.00000, 0.00000, -0.70711, 0.70711>:0:3
TRO:Tiletrap:<0.00000, 0.00000, -0.22998>:<0.00000, 0.00000, -0.70711, 0.70711>:0:3
TRO:BearTrap:<0.00000, 0.00000, -0.14209>:<0.00000, 0.00000, -0.70711, 0.70711>:0:3
TRO:MothTrap:<0.00000, 0.00000, -0.10132>:<0.00000, 0.00000, -0.70711, 0.70711>:0:3
TRO:Ghosttrap:<-0.02599, 0.02077, -0.11597>:<0.00000, 0.00000, -0.70711, 0.70711>:1:3
TRO:Santasack Trap:<0.02046, -0.09583, -0.16357>:<0.00000, 0.00000, -0.70711, 0.70711>:0:3
TRO:Ice Trap:<0.02254, -0.02321, -0.04541>:<0.00000, 0.00000, -0.70711, 0.70711>:0:1
TRO:SnowTrap:<-0.04269, -0.09171, -0.06299>:<0.00000, 0.00000, -0.70711, 0.70711>:0:1
 ERuneTrap
Flash knockout
Strip completely
Area effect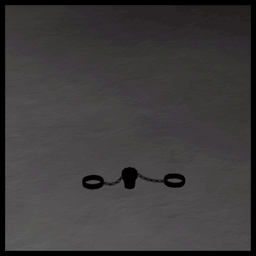 BearTrap
Traps your temporarily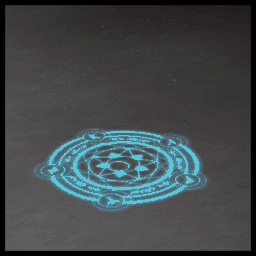 RuneTrap
Flash knockout
Strips one set of clothing
Area effect SpiderTrap
Trap you in a web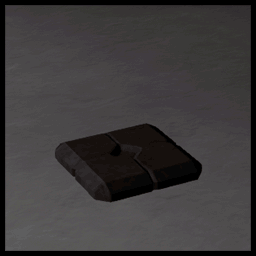 Tiletrap
Knocks out out
Area effect BearTrap
Traps your temporarily MothTrap
Strips completely
Area effect Ghosttrap
Erotic Ghost
Strips one set of clothing Santasack
Traps your temporarily Ice Trap
Freezes your temporarily
Erotic Ice
Strips one set of clothing SnowTrap
Traps you in snow
Strips one set of clothing
Only add the props you wish to exclude from your game to the notecard. Unless something do not fit your theme, do not add any.Refer to this page regarding the props and what they do: Fright Props
BLP:Dildo
BLP:Chocolatebar
BLP:Pumpkin_Pie
BLP:Cupcake
BLP:CandyApple
BLP:Candycorn
BLP:TreasureMagnet
BLP:TreasureFinder
BLP:CameraFlash
BLP:NoiseGen
BLP:Snarestake
BLP:FlashlightJammer
BLP:FlareGun
BLP:Glueflask
BLP:MothElixir
BLP:Spankpaddle
BLP:Pink Vibrator
BLP:Hologen 5000
BLP:Summoning Pendant
BLP:MagicMirror
BLP:Flashbombs
BLP:Holly Wand
BLP:Mistletoe
BLP:CandyDildo
BLP:Walnuts
BLP:HotChocolate
BLP:Julmust
BLP:Eggnog
BLP:EnergyDrink
BLP:Charged Pendant
BLP:Army Flashlight
BLP:Lantern
BLP:Flashlight
BLP:Work Lamp
BLP:Vintage Flashlight
BLP:Glow Vial
BLP:Spare Battery
BLP:Foodpack
BLP:Chompy
BLP:Bracer of Pantstealing
BLP:Night Vision Goggles
BLP:Muffin-theif’s Bandana
BLP:Glue Solvent
BLP:Neckbell
BLP:Emergency Stitching Pack
BLP:Pastamancer’s Spoon
BLP:The Lollygagger
BLP:Spellbook
BLP:Wizzy Hat
BLP:Vul Gas Grenade
BLP:Pocket Watch
4. Save the notecard
You will be using this notecard to paste in the information your receive from the FrightDev HUD and place the final notecard inside the TOME (more information later in the guide).
TIP
I often use a different word document that allows more options for find/replace and editing, then paste the final version in the notecard. Use whatever is the easiest for you.
FRIGHTDEV HUD
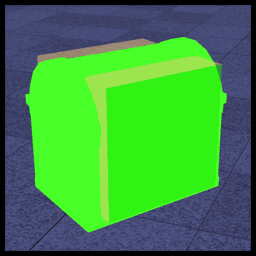
When you click on the majority of the buttons in the FrightDev HUD, it will spawn a box in front of you. You need to move this box in the position you want and click it, which you will give you a line of text with the type of item, location and rotation information that you need to paste in the notecard that you created earlier.
Below I explain what each button does, how to use it and the information it returns.

ADD PROP
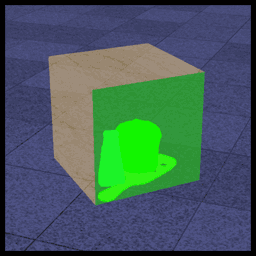
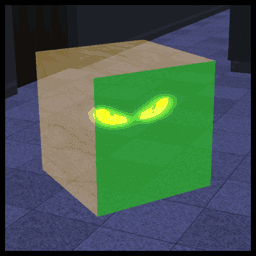
Click the item to rez the cube and place it where you want a prop to be spawned. This will be the item players pick up to use against other players (flash bomb, ghost necklace, paddle, etc.) or themselves (food, drink).
- Location: Tables, Counters, Beds, Seats, Crates, Etc is all good places to place props.
- Warning: Be careful adding props to the floor as it can be a hassle to pick up a prop due to it being so low.
Text Result Example
ASL:<-1.43226, -2.57622, 0.16138>:<0.00000, 0.00000, 0.78946, 0.61380>
PULL CHAIN
You need to stand close and face a vertical surface (wall, pillar, etc) for the button to spawn a pull chain. This item is used to unlock doors on the level.
- Location: Walls will be your main focus with this.
- Important: Later in the guide it is explained how pull chains and doors work together.
- Warning: Make sure this is not blocked in any way, as it will leave a door locked and might block other elements of your game.
Text Result Example
TRG:PullChain:<0.46631, -1.62662, 1.24414>:<0.50000, -0.50000, -0.50000, 0.50000>:0
HUNTER SPAWN
Click the item to rez the cube off the floor and place it where you want a hunter spawn location to be. This item is where a hunter will randomly spawn when starting the game. This is also where players that use the flash bomb randomly end up.
- Location: Place this where the hunter will spawn. Best practice would be to hide it behind crates, stairs, etc. This minimize the chances that the hunter will spawn on another player.
- Warning: Make sure to not place this in a room that can be locked, or else the hunter will be stuck until that door unlocks.
- Warning: Keep the item at the height it rez or else the hunter will spawn in the floor.
Text Result Example
HSP:<-3.97649, -0.42627, 0.86011>:OFFSETHSP
TREASURE
Click the item to rez the cube on the floor and place it where you want a treasure to spawn. This item is what players need to find and take back to the TOME.
- Location: Place this in a hidden area, often in a locked room and not too close to the TOME. This allows the treasure not to be easily or quickly found, and adds a chance for the treasure carrier to be caught.
- Warning: Make sure to not block the treasure, or have it rez in a wall/floor. This will prevent the game from ever ending.
Text Result Example
TRS:<-2.77027, 1.75032, 0.21143>:<0.00000, 0.00000, 0.63696, 0.77090>
TRAPS

Click the item to rez the cube on the floor and place it where you want a trap to spawn. This will be traps that will either strip or trap players.
The trap have an extra option to add 1,2 or 3 add the end of the text.
- This allows the Outdoor traps to spawn. (Snow, Ice, Santa Sack)
- This allows Indoor traps to spawn. (Bear Trap, Piston, Rune)
- This allows to either spawn outdoor or indoor traps.
- Location: Floors/walkways/etc
- Warning: Try to separate traps a bit and do not overdo it. Slightly hiding the trap adds a bit of challenge to your map.
Text Result Example
TRL:<-5.16827, 0.45842, 0.16138>:<0.00000, 0.00000, 0.58538, 0.81076>:3
DESC CREATOR
The Description Creator will rez but you will not place this anywhere. Instead, it is an item that will generate text for you to place in the description for an object that allows several actions to happen, allowing a user to redress their clothing, making footstep sounds and more.
To use this, click the Des Creator item and select the option you want. Select <PRINT> and it will give you text that you will add in the description of an object.
Most are self explanatory, but below is a small summary of what option does and where you would use it, starting with the two most important items.
Footsteps (Important)
- This allows floors to make specific sounds when you walk on it, like grass, concrete, stone, etc.
- Location: Anything a player can walk on. If you miss anything, there will be no sound when the player walks over that.
Dresser (Important)
- This gives you the text DRS that you will add to make a user redress their clothing if they are completely strips
- Location: Closets, drawers, clothing piles, etc.
Tap
- Makes anyone in range turn toward the player that interacted with this.
- Location: Windows or items that will make sound and alert players in a certain range.
MoveLock
- Freezes the player in place for a certain amount of time.
- Location: Add it to an icicle for example so that when players interact with it, it freezes that player.
Text
- Allows certain text to display for the player when they face objects.
- Location: Often used to display a permanently locked door, or funny text when facing specific items.
Cooldown
- Information missing – update pending
Vul
- Makes the player vulnerable to be caught for a certain amount of time.
- Location: Add to items like soap.
Touchsound
- Plays a sound of your choosing when a player touches it.
- Location: Items like a piano, or window tapping.
Seats
- Allows the player to sit on an object when they touch it.
- Location: Bed, chairs, etc.
Animation
- Plays a certain animation, with a full list of animations available when you type “animlist” in local chat while wearing the Fright game HUD.
- Location: Anything where an animation would make sense, like a seating animation on a chair.
<PRINT>
- Displays the currently selected option in text for you to copy in an object description.
<READ>
- Reads the current description that has been added to the Desc Creator. Used to copy and paste text from object descriptions to modify or understand what they are.
GET SCRIPT
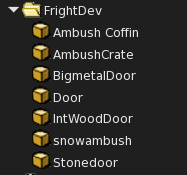
This option will give you a folder with several items that you can use to build your map, like doors and ambush locations.
As with the other items, you rez this on the floor and place it before clicking it to get text that you can copy in the notecard.
Door / IntWoodDoor / BigmetalDoor / Stonedoor
Rez the item of your choice on the ground and move it into position.
- Location: As what you would expect from a door, anywhere you want to delay or lock and entrance or exit to a room.
- Important: Later in the guide it is explained how pull chains and doors work together.
- Warning: Doors swing/move in a certain direction. Be sure to test this.
Before clicking the door, you have to give it a description. This has to be unique or else the map will not have the door rez correctly.
For example: Door1, Library, Office.
Click on the door after placing it.
Text Result Example
SPA:IntWoodDoor:<2.03439, 4.92380, 1.16162>:<0.70711, 0.00000, 0.00000, 0.70711>:<1.29385, 2.50027, 0.28668>,Door1
TEL:Door1: :8ae0e71f-6763-067f-073b-b299d687bc98

AmbushCrate / Ambush Coffin / Snowambush
Rez the item of your choice on the ground and move it into position.
- Location: Place this where you want players to be able to ambush other players. Corners, Hallways and areas where it will blend (snow for example) is great locations.
- Warning: Do not overdo this in your level. This can be frustrating to players that constantly get ambushed.
Text Result Example
SPA:AmbushCrate:<0.90072, 6.00021, 0.43506>:<0.00000, 0.00000, 0.00000, 1.00000>:
BUY MESHES
This will give you a link to the JasX store by Jasdac Stockholm with free mesh items that you can use in your level.
DOORS & DUCTS
DOORS / PULL CHAIN
Doors and Pull Chains need to be balanced to make your map interesting, but at the same time not leave all doors open at the same time.
The amount of pull chains there are represent the amount of doors that will be locked.
- For example: If you have 10 pull chains, and 12 doors, 10 random doors will be locked at the start of the game.
Important: Pull chains should also be setup in such a way that it can be accessed without having to unlock a door.
If you have two or more pull chains behind locked doors, they can be randomly assigned to unlock the door that blocks the other pull chain and you end up with a Chicken and Egg situation.
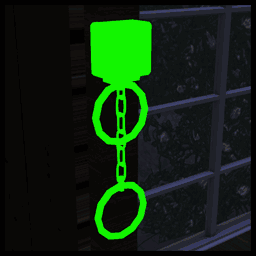
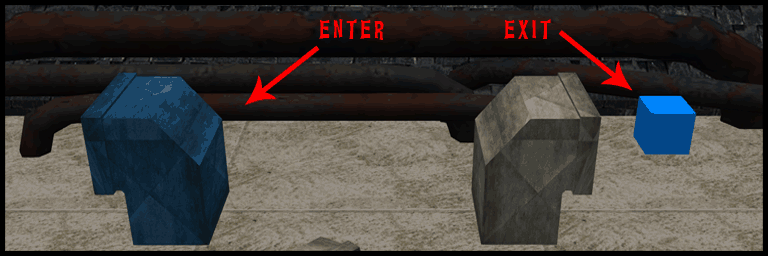
DUCTS / TELEPORTERS

This can be setup to allow players to travel across the map quickly and without the need to physically walk there.
To do this, you need the local distance between the two points and add it in the description.
- Get the distance between the ENTER and EXIT points. Below is a small script that will help you calculate it.
- Add an offset at the EXIT as this will be the point the player will be moved. You do not want the player to be moved inside a vent/wall.
- The following format needs to be used and added to the ducts descruption.
TEL:NAME:<Local distance to exit> CUS
For example:
TEL:DUCT:<7.5,1.8,0.7> CUS
4. Add the following line to the notecard.
TEL:DUCT:cb37b81b-bfef-cdf9-6f2c-9605801732e2:01206f26-d594-00f7-9236-0676e58654cf
The image below shows the ENTER point, and where the EXIT would be. Note that the EXIT location is represented as a blue cube, and not the second duct as that will cause the player to be moved inside the second vent.
Enter and Exit position calculator script
vector ENTER = <1,1,1>; //Add the position of the enter location.
vector EXIT = <2,2,2>; //Add the position of the exit location with the offset.

default
{
    state_entry()
    {
        llOwnerSay("Distance to exit is: " + (string)(EXIT - ENTER));
    }
}
FINISH
Notecard
When you have placed all your items, got the text (and modified it correctly), put it all in the Assets notecard you created earlier.
Place this notecard into the TOME then. If there is already one in the TOME, remove it.
Testing your map
Wear your Fright game HUD and click the tome. You might have to reset the tome to let all your information in the assets notecard rez.
Join the game, start it and monitor if everything rezzes correctly.
If everything looks good, you will want to test this with several people. 5 people is usually a good test, but that depends on your map.
That is it. I hope this guide helped you create a really fun map for Fright.
If you have any feedback about this guide, or questions regarding Fright maps in general, please use the contact form on my site here or contact me in world.
–Drau
Credit to:
- Jasdac Stockholm for creating these games we enjoy.
- Kulza Bluestar for the continued development of Fright and assistance with this guide.
Images taken in Second Life by Drau
Guide written by Drau